Quick & Easy DIY Shower Curtain Ideas

If there’s one thing that can complete the relaxing experience of a quiet bath at night (or those quick and energetic showers in the morning), it’s a DIY shower curtain. DIY shower curtain ideas are a quick, easy, and affordable way for a bathroom makeover. Heading over to stores and getting a new curtain is probably the easiest way, they can be quite expensive. Bet if you’re looking for a fun DIY project to make your own shower curtain, don’t miss our list of the best DIY shower curtain ideas!
DIY Shower Curtain with Paint & Stencils
Painting and stenciling are an important part of any DIY project and a DIY shower curtain is no exception. You can use stencils to customize your curtain and add a little bit of personality to your bathroom.
For a DIY shower curtain design using paint and stencils, you can choose different methods. For example, you can keep things nice, clean, and neat; or go all throughout. Also, you only use your favorite color and have a monochrome DIY shower curtain design for an extra character; or go for some contrast.
DIY Shower Curtain from Sheet
If you’re a DIY enthusiast who enjoys project that use reclaimed or upcycled materials, we recommend a DIY shower curtain from sheet. Such curtains give a vintage look to your space. If you already have a bedspread that you don’t use anymore, you are ready to make your own shower curtain. If not, pay the nearest yard sale or thrift store a visit and get one.
Make Your Own Shower Curtain with Tablecloth
In addition to reclaiming vintage bed sheets, you can start a DIY shower curtain from tablecloths too. For more sophistication and style, we recommend using vintage tablecloths as well. The great thing about these ideas with tablecloths and bed sheets is that they are super easy. A few simple step and viola; you’re DIY shower curtain is ready for installation.
DIY Shower Curtain Ideas Using Different Fabrics
If you are not a novice in sewing, the sky would be your limit in shower curtain hooks ideas. There are tons of creative ways to make your own shower curtain with some extra fabric and sewing skills.
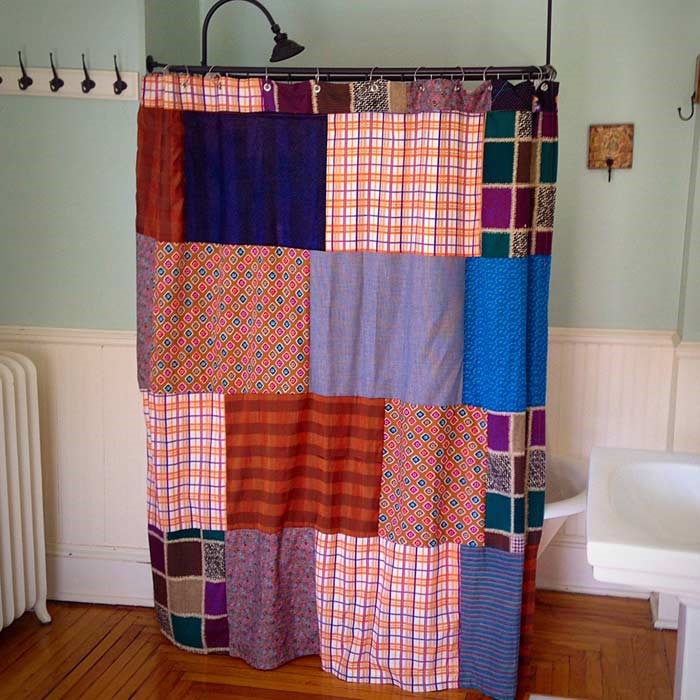
If you adore different patterns and colors, we think you’re going to love hanging a DIY patchwork shower curtain in your bathroom. It’s time to take advantage of your skills in sewing, and that stash of scrap fabric in your closet. Instead of a simple DIY shower curtain design, you can make your own shower curtain with some basic and squares of differently patterned and colored material.
You can also try color blocked shower curtains. This is a great idea for a shower curtain if you want to add some color to your space and make your own shower curtain from scratch. Using bold and bright colors, your eye-catching curtain will certainly leave an impression.
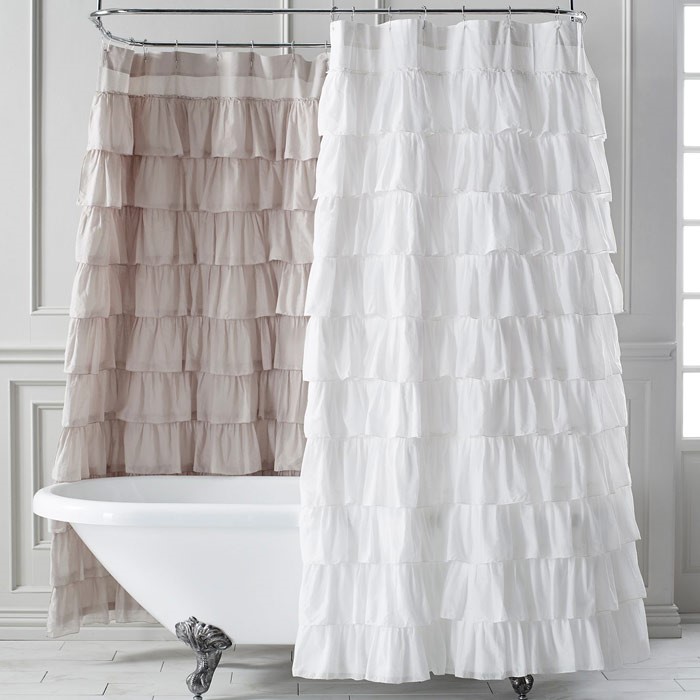
Among DIY shower curtain ideas using fabric, you also have the option of textured curtains. Ruffles and textures give your curtain and space a unique character. As you can guess, the store version of these curtains can be really expensive. But in a few simple steps, you can make a curtain that works great in bathrooms with a contemporary or modern decoration.
DIY Shower Curtain Design with Macrame
Macrame is a super popular wall art right now. But that doesn’t mean that you can’t use it in your DIY shower curtain Project. If the sheet that you’re using isn’t long enough, you can add a macrame to your curtain instead of sewing trip over the curtain. As you know, long curtains will make the ceilings look higher and the space bigger.
For DIY projects with macrame, you just need some macramé trim, twisted cotton rope, sewing machine, scissors, and of course the shower curtain.
Shower Curtain with Blankets
That’s right, a blanket. There are different opinions about DIY shower curtain ideas with a blanket. Some people find the sweater-like material of throw blankets unusual and unappealing, while others find it adorable, warm, and brilliant. However, this project comes with a challenge. Because of its weight, you might need some extra time and effort to hang it perfectly.
How to Make Your Own Shower Curtain
After choosing your favorite idea, all you need to do is the simple process of making your curtain. Here, we have prepared a basic tutorial that you can use. These are the most important steps to make your own shower curtain:
Choosing and Preparing the Fabric
As you saw, there are many fabrics that you can use for a DIY shower curtain design. However, most professionals recommend you pick a fabric that handles moisture well; fabrics like polyester or vinyl.
Usually, shower curtains measure 72 x 72 inches, and stall shower curtains measure 50 x 78 inches. Since most fabrics are not available in a 72-inch width, you’ll need to put together two panels. So remember to match up your pattern if you’re using a patterned fabric or a print. This step typically won’t be necessary if you go for a DIY shower curtain from a sheet.
No matter the size of the fabric, you’ll need to add on 16 inches in length and 8 inches in width. This is for the hem. After putting the two panels together, you’re ready to sew.
Sewing the Shower Curtain
First, you’ll need to fold the top down 4 inches, and then iron it flat. Then, you need to repeat it again. If you’re using a lightweight fabric, it’s a good idea to apply a strip of interfacing to the top edge. This will help to stabilize and support the DIY shower curtain weight.
The next step is pinning the fabric so the folds stay put, and repeating it for the bottom. Repeat these steps for the sides as well, but turn them in 2 inches instead of 4 inches.
Grommets
You can put in buttonholes, or go with grommets. However, this step (which is fairly easy) is what can make the difference between a simple DIY shower curtain and a professional job. After purchasing a grommet tool kit, here’s what you need to do:
- Mark the center of your grommets on the fabric (a DIY shower curtain usually needs 12).
- Punch holes on the curtain. Most grommet tool kits have a tool to punch a hole in the curtain fabric.
- Place the grommet bottom on the side of the fabric that will face out. Then, put the top piece on the backside.
- Place the metal cylinder in the kit under the bottom grommet. There is also a metal piece; place it on the top one.
- Hammer these pieces together until the grommet can’t spin around. Repeat with the remaining grommets, and you’re done!


- In this post:
- DIY Shower Curtain with Paint & Stencils
- DIY Shower Curtain Design with Macrame
- Shower Curtain with Blankets
- How to Make Your Own Shower Curtain