How to Make a Terrarium

The idea of having a miniature yet full garden in your house with the most amazing plants, which provides beautiful decor as well as relaxing gardening time, might seem too good to be true. But it is real, and its name is a terrarium. And in today’s post, we are going to tell you how to make a terrarium in three easy steps and how to care for it.
What Is a Terrarium?
comprised of the Latin words of “terra” meaning earth and “arium” meaning place or receptacle, terrariums (or terraria) are indoor gardening glass containers. terrarium containers are fully or partially enclosed to allow airflow, heat, light, retain moisture, and allow you to access the plants inside and maintain them.
A sealed glass terrarium has its own water cycle inside since the moisture from both the soil and plants evaporates in it. The vapor later condenses on the container walls, falling back to the soil. Due to the constant supply of water and light passing through the glass (allowing photosynthesize), such an environment is perfect for growing even the most exotic plants successfully.
Where Did Terrariums Come From?
Ever wondered where did these beautiful creations come from and what is their history?
The first terrarium was made by a botanist named Nathaniel Bagshaw Ward in 1842. He was fascinated by insect behavior. One day, he accidentally an incest jar unattended. What happened later includes a fern spore growing in the jar grew, germinating into a plant, and creating the first terrarium. Called “the Wardian case”, these containers quickly spread in the Victorian Era among the English.
What Will Your DIY Terrarium Look Like?
Before making your modern Wardian case, it is better to have an idea of what you want to create. You have two options when it comes to mini terrariums. See which one works with your condition better:
Closed Terrarium
These types are perfect for tropical plants like mosses, orchids, ferns, as well as air plants. Closed containers can mimic the humid and sheltered environment of the tropics and allow such species to thrive with no problem.
You need to keep such terrariums for water circulation and only open once a week to remove excess moisture from the air and container walls. You need to do this to prevent mold or algae that could damage the plants and discolor your DIY terrarium. You need to water this enclosed garden occasionally. As a rule, if you see no condensation on the container walls or wilting of the plants, it is time to water.
You should provide such terrarium containers with a soil mix like sterile peat-lite that ensures good growing conditions while reducing the risks of microbial damage. Peat-lite is a mixture of peat moss, vermiculite, and perlite.
Open Terrarium
If your favorite plants prefer less humidity and soil moisture such as cacti and succulents, open terraria are a better choice. Plants from dry zones that require more direct sunlight pair well with open, unsealed terrariums that do not have excess moisture without trapping too much heat, which could kill the plants inside.
Note: A mini terrarium (open or closed) is not your only option, you can also make larger ones that can hold common houseplants. For larger ones, do not forget to avoid fast-growing species or the ones with large leaves that can block the light from entering.
How to Make a Terrarium?
Alright, now let us see how to build a terrarium in e few steps.
Prepare the Mini Terrarium Essentials
This step is the main thing that you need to have a DIY terrarium. After that, you are only minutes away from having an adorable miniature garden.
Tools
You will only need:
- Garden trowel or a large spoon
- Spray bottle
- Scissors
- Suitable soil and drainage material
- Decorative elements like shells, figurines, etc. (optional)
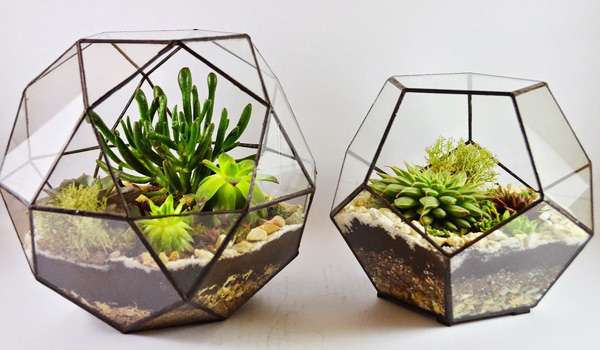
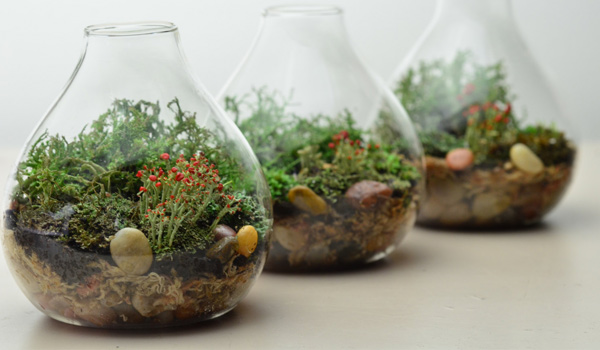
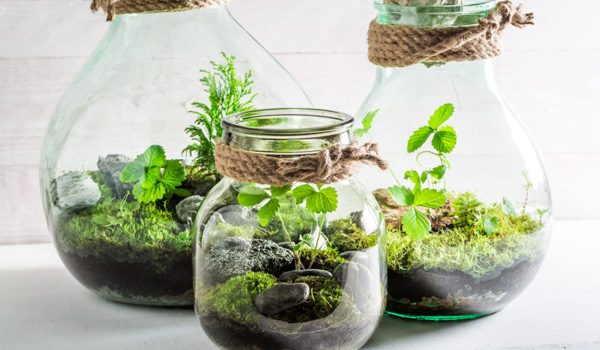
Container
There are a surprisingly wide variety of terrarium containers available in stores. From miniature Victorian greenhouses to terrarium containers that sell for hundreds of dollars. There are a lot of options to choose from.
For a DIY terrarium, you can even use glass jars or any glass or plastic container with or without a lid (as long as they are transparent), with a wide mouth. Aquariums, goldfish bowls, cold frames, tureens, cloches, etc. are other available options.
Just remember that open models are more convenient as they are less likely to experience problems with condensation and fungal diseases.
Plants
Plants that thrive in low to medium light are perfect for your mini terrarium. Keep in mind that although succulents are a popular choice for glass terrariums, they are not the best choice. The lack of drainage holes in these containers increases the chance of root rot. However, if you can provide under-watering, go for them. You can also make things better by filling fully open containers using a potting mix with plenty of coarse sand.
To have a small terrarium with more visual appeal, choose a mix of leaf sizes, texture, and color. Also, they should be small enough so that they do not touch the container sides after fitting. Here are some of the recommended plants for such gardens:
- Polka dot plant
- Lucky bamboo
- African violet
- Nerve plant
- Prayer plant
- Small ferns
- Club moss
- Pothos
Set the Terrarium Layers and Decorate
Now that you have everything ready, let us see how to make a terrarium:
Drainage Layers
Start with creating the drainage layer. Since these containers do not have drainage holes to keep water away from plant roots, it is crucial to provide this layer to serve as an alternative. So first, add a 2-inch layer of gravel or crushed stone to the bottom of your container. If you have a tall and narrow container, consider a deeper layer. Add a ¼ to a ½ inch layer of activated charcoal for better drainage as well as controlling any odors too.
Moss and Potting Mix
The next terrarium layers include sheet moss and then the potting soil. The sheet moss is to keep the charcoal and the soil from mixing as well as some visual interest. Continue by adding slightly moist potting soil (without any fertilizer) as much as the plants will fit with room to grow and not touch the container. But it should not be less than a couple of inches.
Add Plants
Now it is time to visualize the design of your mini terrarium. Think about where each plant is going to be, where you want to create mounds and dips in the soil, or the placement of the ornamental pieces.
When you have the overall design of your DIY terrarium, dig a planting hole for each plant. One by one, remove them from their pots and plant them in their hole. Use chopsticks, tongs, or some kind of long tweezers in case you have a container with a narrow opening. After placing each plant, press the soil gently to secure them and remove the excess air pockets.
If a plant is rootbound, trim some of the longer roots off using garden ships. This root pruning slows the plants’ growth down, which is essential when growing plants in a mini terrarium. Do not forget to trim off any yellowed or damaged leaves too.
When all the terrarium layers are done, use the spray water as much as the plants are just damp. Use it to clean off any dirt clinging to the container sides as well (then wipe it clean with newspaper or a paper towel). Never use glass cleaner because it can harm the plants.
Optional: When all the plants are where they should be, you can decorate the inside of the terrarium bowl and the space between the greenery with shells, beautiful stones, and other decorative accents.
Maintain with Terrarium Care
A spot with plenty of filtered light (and not harsh direct sunlight) is suitable for your garden under glass. A slightly shaded south-facing window would be perfect. If such location is not available, provide LED or fluorescent artificial grow lights for your plants that do not produce much heat and allow the plants to thrive.
If you made an open DIY terrarium, feel the soil from time to time to see if it is dry and requires water. If you have a closed terrarium, the irrigation sessions significantly decrease as it retains water more. However, a closed container needs inspection for condensation. So, take the top off at least once a month to increase airflow and wait until the condensation is gone. Remove the small terrarium’s top if you watered too much as well.
Another step of terrarium care is pruning yellow or damaged leaves. You can prune a completely healthy plant that is too large for the container too. And finally, never fertilize your glass garden. Terrariums will have all the nutrients they need through the potting mix’s natural decay.
Now that you know how to make a terrarium and how to care for it, everything is ready to create it. Share your experiences with us and let us know if you gifted it to someone or decorated your home with it!


- In this post:
- What Is a Terrarium?
- What Will Your DIY Terrarium Look Like?
- How to Make a Terrarium?