How to Install Vinyl Plank Flooring Quick & Simple?

It is well established that vinyl flooring is a favored material in decoration, not only because of its beauty but also because of the numerous benefits that they offer. One of the main advantages of vinyl compared to other types of flooring is the easy and quick installation.
Some models, such as vinyl click flooring, can be installed in less than two days, allowing you to elevate and use the space in no time. In addition, vinyl flooring installation creates almost no mess.
Knowing how to install vinyl flooring is indeed essential, however, preparing for a successful installation begins even before purchasing the flooring material. First, you need to make sure that the surface is ready and able to hold the vinyl.
How to Install Vinyl Flooring: Tools & Materials
You will need these tools:
- Tape measure
- Cardboard knife cutter
- Face mask
- Chalk line reel
- Gloves
- Set square
- Trowel
- Metal ruler
- Rib Saw
- Jagged trowel
- Miter box
As well as these materials:
- Quarter round
- Bits 1 1/2″ x 15
- Vinyl flooring
- Contact adhesive
How to Install Vinyl Plank Flooring: Before Starting
This vinyl floor is characterized by being highly resistant to traffic and scratch. That is why it can be used in corridors, living rooms, dining rooms, or bedrooms. It is also resistant to humidity, so you may also install it in the bathroom and kitchen. It is also very easy to clean (you will only need a damp cloth).
Before reviewing the steps on how to install vinyl flooring, keep in mind that:
- The main requirement for vinyl flooring installation is that the floor must be very finished, otherwise, the imperfections would be transferred to the new floor.
- The place where the vinyl floor is going to be installed must have a minimum temperature of 18ºC and the relative humidity cannot exceed 65%.
- The boxes with the vinyl floor must be where they are going to be installed 48 hours before the process begins, to achieve the correct acclimation.
- In case there is underfloor heating or some type of heating source near the floor, turn them off 72 hours before installing vinyl flooring and leave them off 72 hours after the work is finished.
- If the floor slab or the slab is new, it must be cured for at least 90 days.
How to Prepare the Floor?
If you want to install on ceramic, use a leveling base to fill the spaces between the tiles. If you want to install the flooring on floor slab, it must have polyethylene that ensures impermeability. It must also be leveled. First, apply an adhesion promoter, and then level it with a leveling base.
Installing Vinyl Plank Flooring
Now that you are well-informed about the requirements, let us start the installation process:
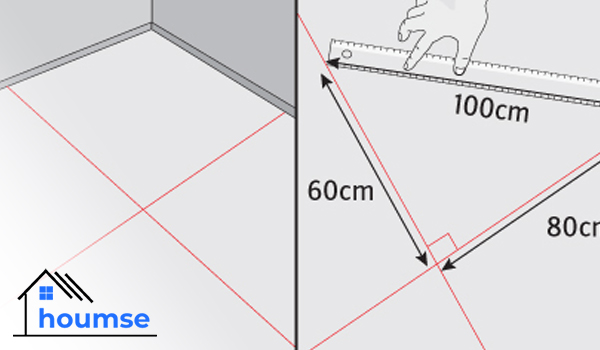
1. Finding the Floor Center
Find the center on the surface and mark it. For this, you need to measure the axis of each wall and draw lines from wall to wall that form a cross at the center of the room.
To make sure that this is in fact the center, measure 60 cm on one chalk line reel and 80 cm on the other. The 2 points are joined with a diagonal, and if those diagonal measures 100, the angle is correct (90º). Remember the Pythagoras theorem? Could you ever guess one day you would use it for vinyl flooring installation?
Tip: Do the installation row by row, since by putting the first one correctly, it is easier to ensure that the rest will fit well without any mismatches in the end.
2. Installing the First Row
Which direction to install vinyl plank flooring? We are going to cover that just now. Start from the axis of the cross towards one of the two sides, so the vertical and horizontal lines will help maintain the levels.
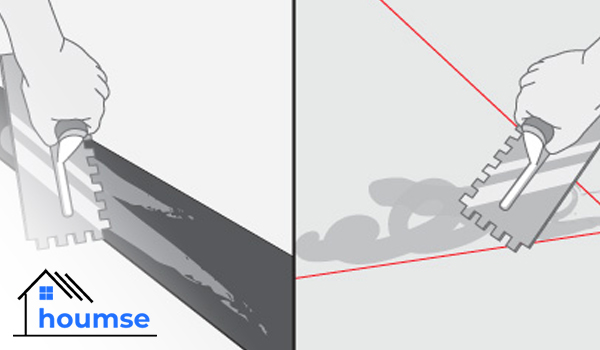
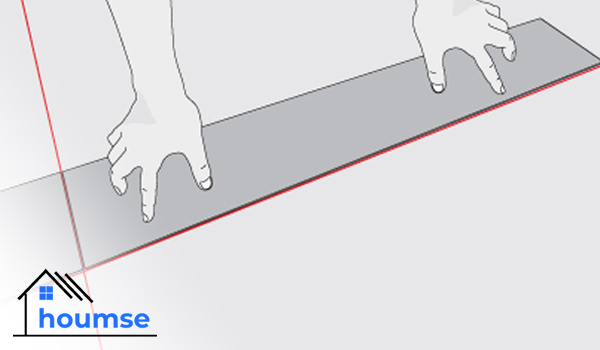
Spread the contact adhesive using the jagged trowel on the back of the plank and on the floor, let it dry to the touch, and then stick the first plank. It should only be pressed by hand to ensure a homogeneous bond. The palmettes are glued without dilation, that is, against the wall and between them.
To stick these vinyl flooring boards together, it is best to use a contact adhesive. It is very important to fit the pieces in place before gluing them to the floor, because the adhesive works quickly, and it will be difficult to correct any mistakes in vinyl flooring installation!
3. Cutting the Vinyl Plank Flooring
At the end of the first row, measure the missing piece needed to complete. Then, use that measure to cut a plank of the same size using the cardboard knife cutter and the ruler. One way to make installing vinyl plank flooring even easier is to heat the planks.
For example, you can leave them in the sun for a while or slightly heat them with a blow dryer (not too close). And this is how to cut vinyl plank flooring.

4. Installing the Second Row
Now you almost know how to install vinyl flooring. However, there are still some things to pay attention to. In order to avoid overlapping the joints between the rows, you need to start the second row by matching the center of the plank with the center of the cross, so all the joints will be alternated.
Spread the contact adhesive with a jagged trowel on the back of the plank and on the floor, let it dry to the touch, and then place the first tile. Like the earlier steps, it should only be pressed by hand to ensure a homogeneous bond.

5. Installing the Rest of the Rows (& Quarter Round)
For the other rows, repeat the mentioned instructions until the entire space is covered. When the vinyl flooring installation is done, since it can be installed with the weatherstrip, you just need to worry about putting a quarter round to hide the edges.
The quarter rounds are cut with a rib saw and a miter box, always with 45º angles so you can join the ends and that they are as little noticeable as possible. They are nailed to the weatherstrip with 1 1/2” nails.

How to Install Vinyl Click Flooring
If you have vinyl click flooring, the installation process would be even easier. In this scenario, you will not need the adhesive. You will simply need to “click” the planks.


- In this post:
- How to Install Vinyl Flooring: Tools & Materials
- How to Install Vinyl Plank Flooring: Before Starting
- Installing Vinyl Plank Flooring
- How to Install Vinyl Click Flooring